We will start by going over the basic steps, and then each step will be expanded in detail.
Menu in bold followed by navigation directions (), are referring to the MYL admin menus and how to navigate to each step.
Menu :( Setup -> Organization -> Season Manager)

Registration Steps:
- Make a new season, Menu:(Setup -> Organization -> Season Manager)
- Update League settings/Cutoff Dates, Menu:(Setup -> Organization -> League)
- Add/Update divisions, Menu:(Setup -> Team-> Division and Team Wizard)
- Update Payment group, Menu:(Setup -> Registration -> Payment Group)
- Make/Update Fee Structure, Menu:(Setup -> Registration -> Fee Structure)
- View/Update Registration setup, Menu:(Setup -> Registration -> Registration Setup)
- Edit/Update Registration wizard, Menu:(Setup -> Registration -> Registration Setup Wizard)
- Test Registration!
Make a New Season:
Menu:(Setup -> Organization -> Season Manager)

Click the "Add New Season" button to start the step-by-step process to creating a new season.
Step 1: Season Name and Type
These two settings will determine the name of your season and the year it encapsulates. This can use a name beyond the standard four seasons if necessary.
Step 2: Import Data
This is an optional step to choose certain pieces of data from one previous season and copy them to the new one. Teams (the team itself, not the players), Officials, and Evaluation Settings are not automatically copied to the new season and must be chosen to do so. This can be done later from other menus, so it does not have to be completed now.
Note: Some other pieces of data are “carried over” automatically as they are linked to the season type. Registration Steps, Fees, and Divisions are all dependent on the “Season Type” of your season (i.e. Spring type seasons use Spring fees). This also is not a copy, so multiple active seasons with the same type will use the same data.
Step 3: Season Dates
Registration Start and End Dates, Dates for opening and closing registration to the public. (Note: admins can always going through a closed registration)
Season Start and End Dates, Dates for your season start and end. Mostly used for game/schedule visibility, dates must be picked even if you are not using MYL for scheduling.
The Early Bird and Late Fee dates are optional and only if your fees will use those features.
Step 4: Season Creation
This is the last step to confirm your season is ready to create. There are also some advanced options to set if you would like.
Which League(s) should this season be accessible? - This setting is for multi-site leagues, to prevent other leagues from using your new season.
Season Order – The list order of the season
Previous Season – This determines which season “comes before” the season you are creating. Certain functions will use data from the previous season, such as pulling last season’s evaluations for reporting or the draft tool.
Season Type – This is the type that ties together some of the aforementioned data (registration steps, fees, and divisions)

Update League settings/Cutoff Dates:
Menu:(Setup -> Organization -> League)
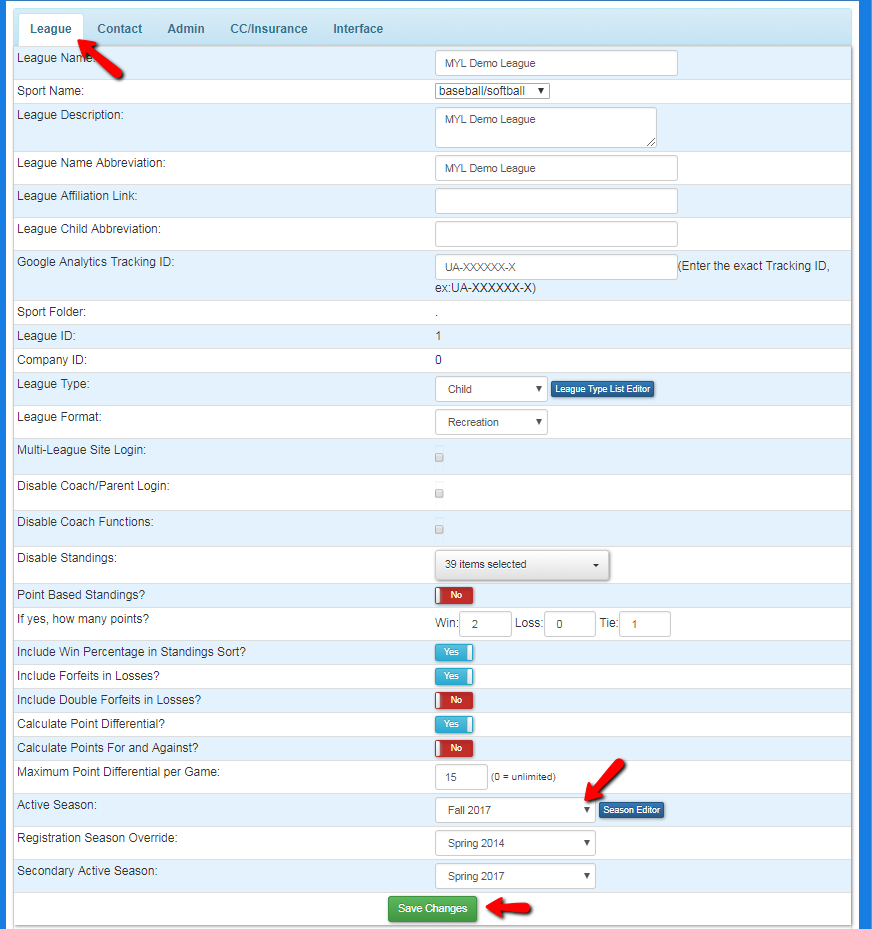
Once the new season has been created, we need to set our newly created season as the active season for our league. Under the league tab, click on the active season drop down and select the season you have created. Then save your new active season by click on the save changes button.
Next step is to edit/update our cutoff settings, by going to the admin tab.
Criteria, setting for cutoff dates to be applied to age, grade, or both.
Gender, Setting for what our league gender is. This setting will override division gender settings.
Start and End, settings for age or grade range for your league. This setting will override age/grade settings for your divisions. Make sure your division ranges fall within your league start and end settings.
Cutoff months, the month used for criteria cutoff. Example, a Player named Jonny registered for your league at the age of 8 and his birthday is in December. The age(criteria setting) cutoff(cut off month setting) is set to September, so Jonny will be age 7 when registration for your league.
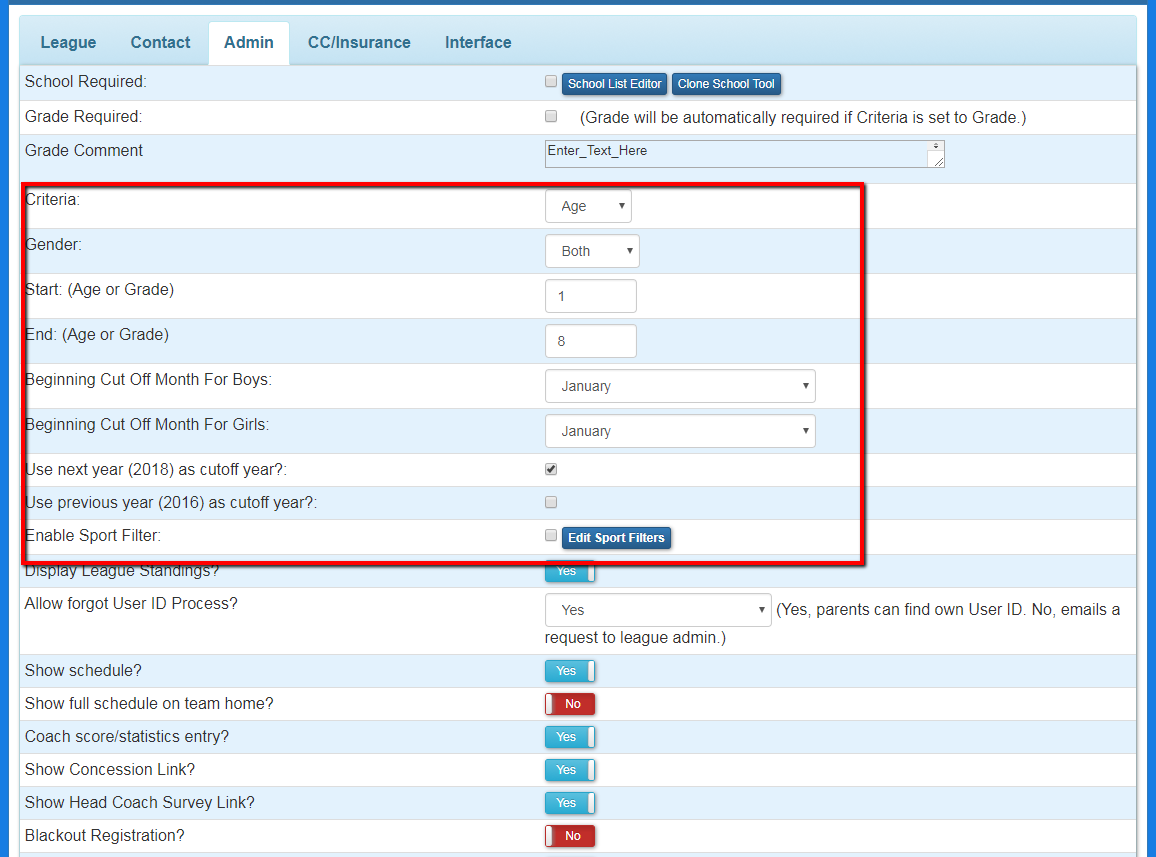
Use month cutoff of next year, cutoff dates are always calculated by the active season’s year. If year is 2016, then the “use month cutoff of next year” setting will calculate all players as being a year older (cutoff base on their 2017 age).
Use month cutoff of previous year, same as the next year setting; but instead of moving players forward one year, we are moving players back a year. Year is 2016, cutoff year will be 2015 if this setting is on.(warning: do not have both next year setting and previous year settings on at the same time. If you want to calculate cutoff months in the current season year, then leave both settings off. )
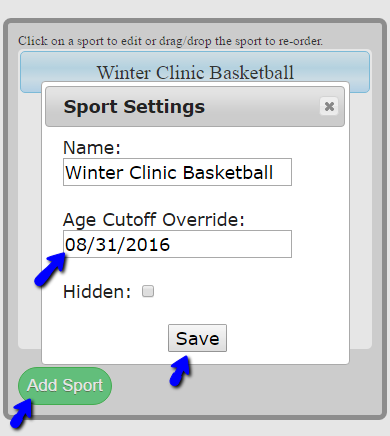
Sport Filters, these settings are for setting cutoff dates based on sports. To enable sport filters, check the sport filter box, then click on the edit sport filters button. Use the add sports button to create a sport filter, and then set the cutoff date, finally save your new sports filter. Sport filters must be tied to divisions to work and sport filters override all league cutoff settings, but league age/grade range.
Once you are done with this page, make sure you click the save changes button at the bottom of the screen to update your league settings.
Add/Update divisions:
Menu:(Setup -> Team-> Division and Team Wizard)
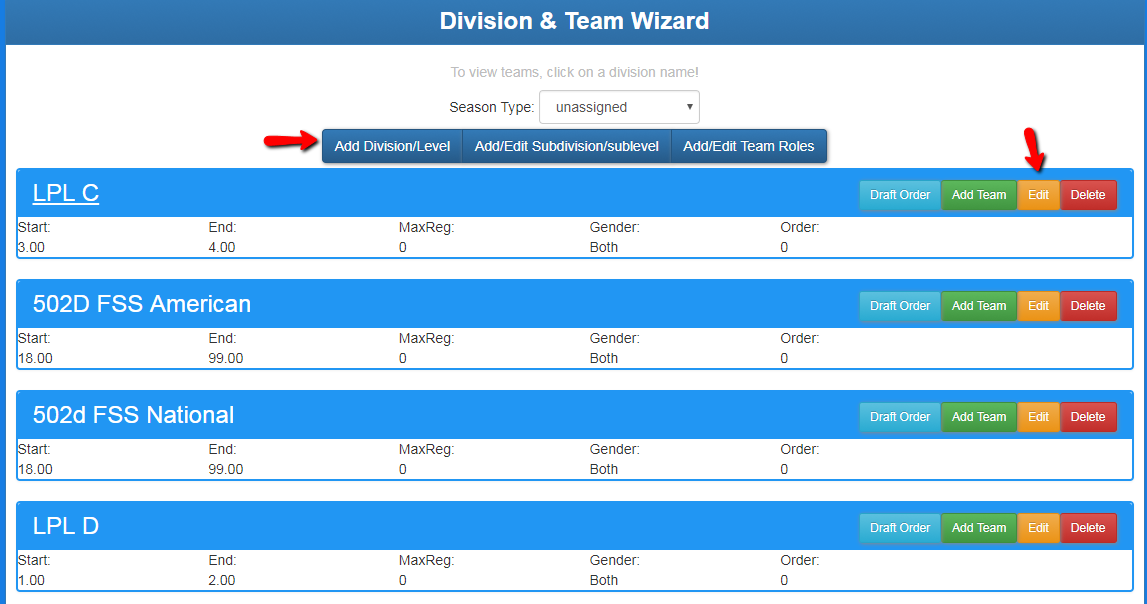
Use “Add Division/Level” button to create new divisions.
Divisions can edited or deleted.
When editing a division make sure to keep age/grade range in-between league age/grade range.
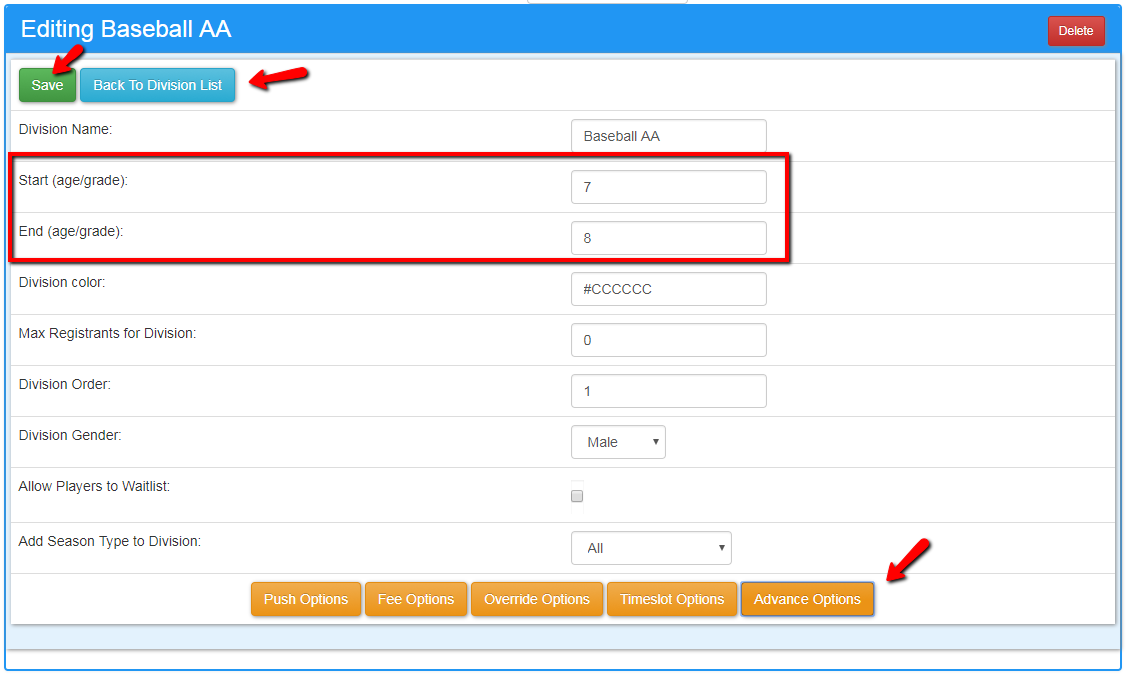
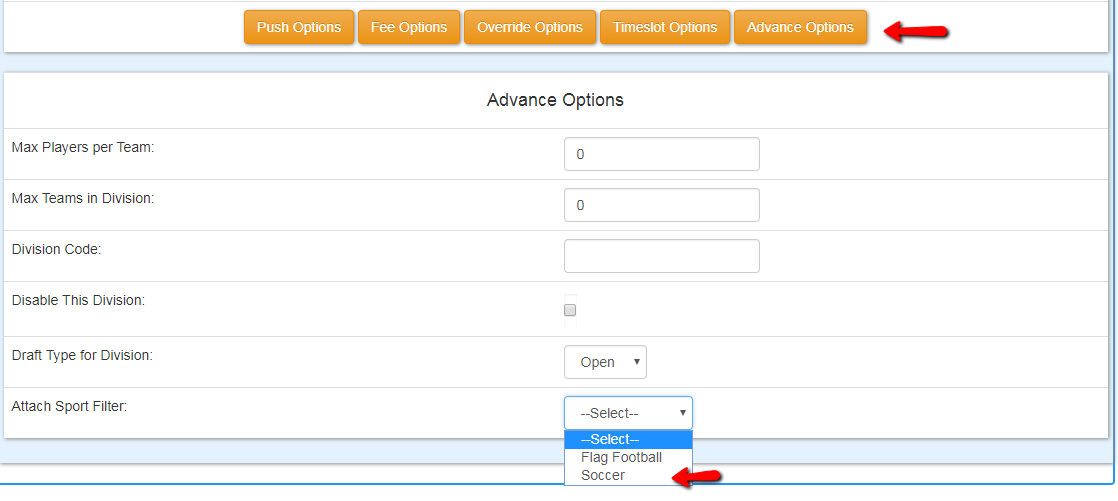
Also if you are using sport filters, click on the "Advance Options" button to show the advanced options below. Attach the filter by using the "Attach Sport Filter" drop down box.
Click the update division button when done editing a division.
Update Payment group:
Menu:(Setup -> Registration -> Payment group)

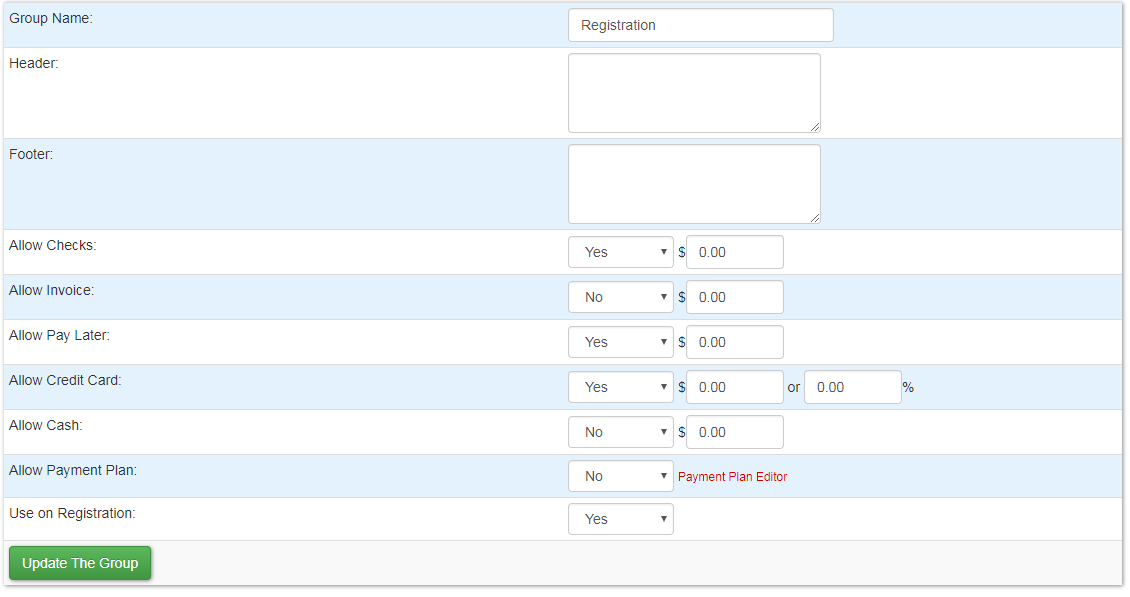
Payment groups are for setting up how a person going through registration will pay. Your choices are checks, invoice, pay later, credit card, cash, and payment plan. Note that all options but credit card and payment plan, are not handled by MYL. These options must be taken care by your league. Credit card and payment plans use MYL's credit card system and these payments are tracked via Authorize.net.
Its best to use one payment group, as there is no need for multiple unless you have more than one league with different payment options. Payment groups are league base and global payment groups are site wide for multi leagues.
Make/Update Fee Structure:
Menu:(Setup -> Registration -> Fee Structure)
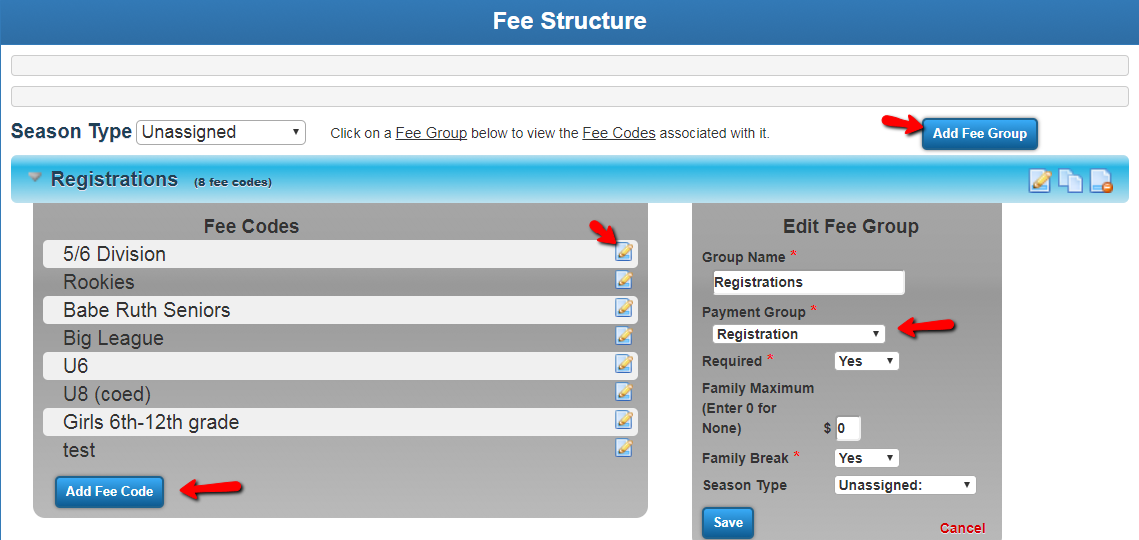
Fee Groups under fee structure are for holding your registration fees that can be charged. Setting up a fee groups needs all red * options filled out.
Group Name, The name of your fee group.
Payment Group, We need to tie a payment group to the fee group.
Required, setting for requited this fees on registration.
Family Break, Payment cutoff for family with multiple players.
Next we need to add fee codes to the fee group. Fee groups can be tied to custom fields, sport, divisions, age/grade range, and gender.
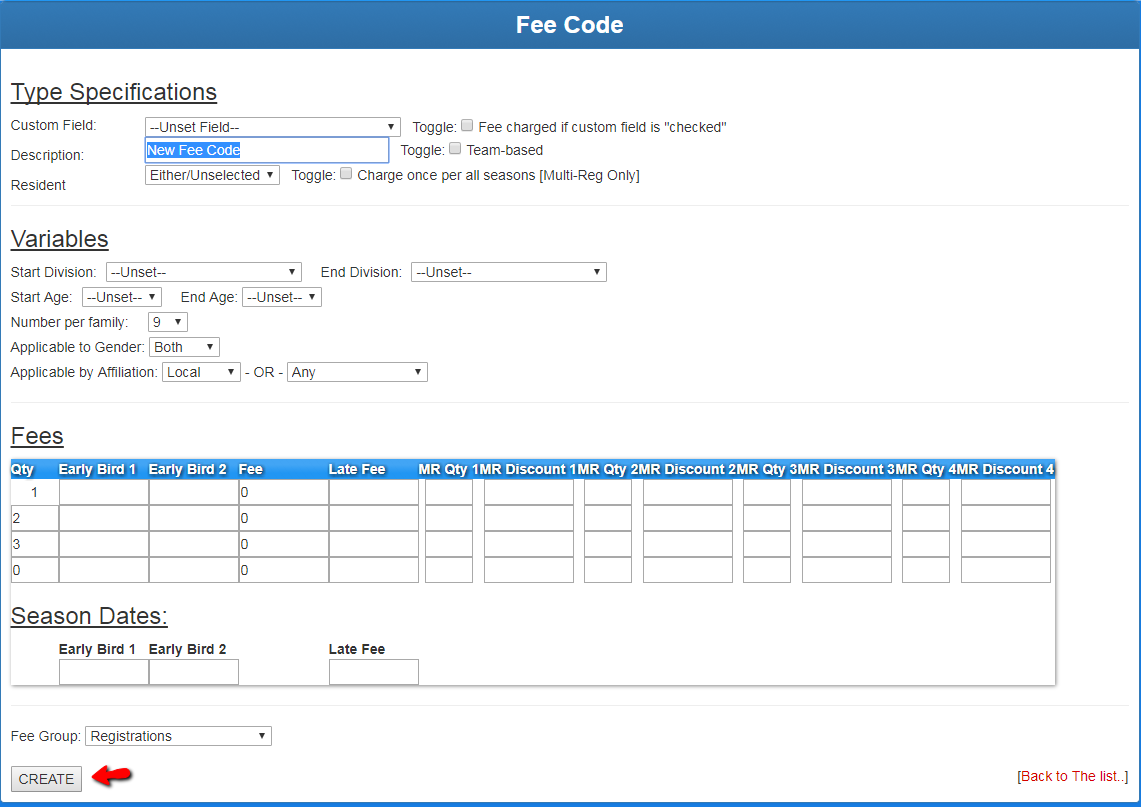
Type Specifications, main settings for registration. custom fields are setup in registration will be gone over then. Description setting is the name for your fee code. Resident setting is for charging fees for residents or nonresidents, if resident settings have been setup.
Variables, settings for applying fees to sports, divisions, age, and gender. Each option will apply this fee based on what’s set. Example, if I set the age range from 5 to 8, then all 5 to 8 year olds will be charged this fee.
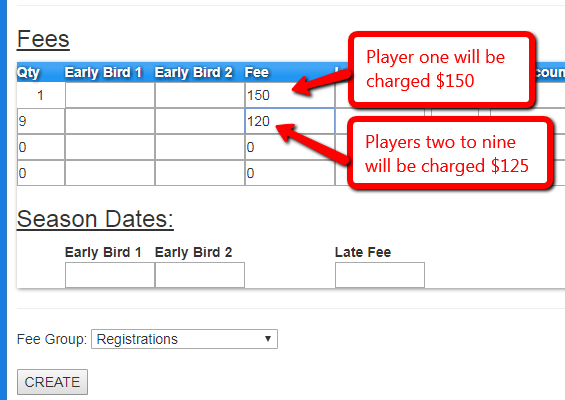
Fees, the amount each player must pay (within one registration) when the fee is applied. The qty is for charging this fee per player. Example, qty 1 is for player one, qty 2 is for player two. If the qty is set to 9 then players 2 through 9 will be charge this fee.
View/Update Registration setup:
Menu:(Setup -> Registration -> Registration setup)
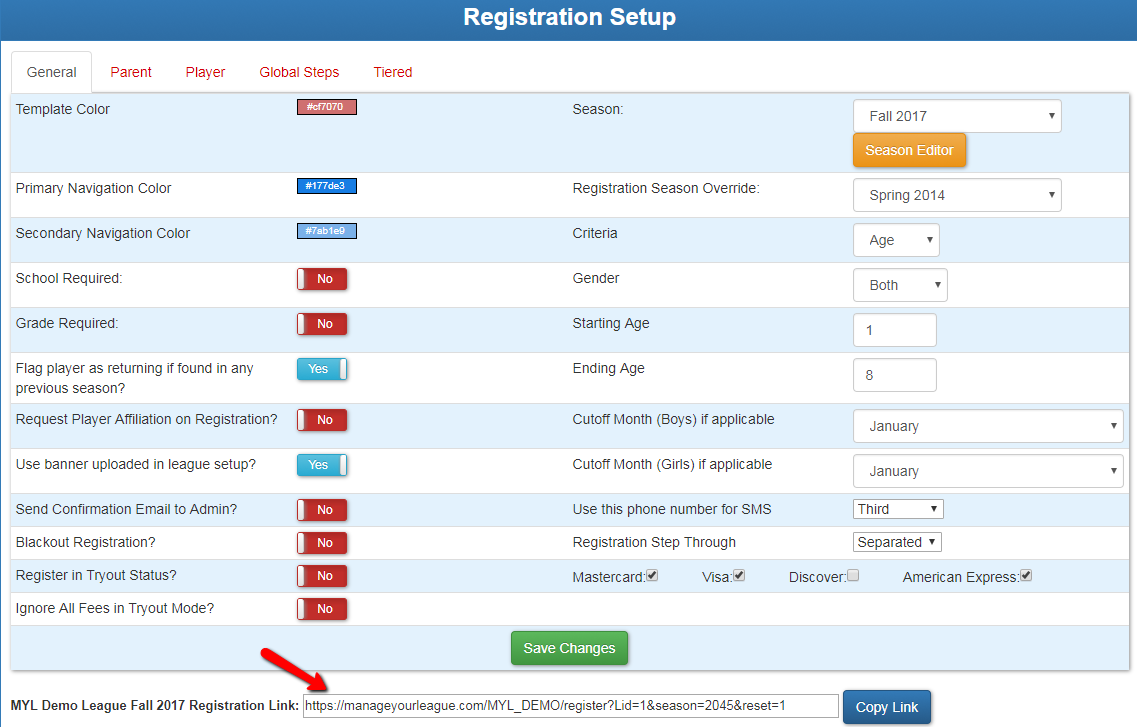
Here, we can go over the general settings for registration. These settings are from the league settings we have already gone over. At the bottom of the page is your registration link for sending to league members.
Edit/Update Registration wizard:
Menu:(Setup -> Registration -> Registration Setup Wizard)
The registration setup wizard is a step-by-step walkthrough of setting up your registration. There are 7 steps (6 for adult leagues) to help you create your registration. You can navigate the steps by clicking on the menu at the top of the page. There are preview buttons on most of this step that let you show or hide a preview of the page. The preview is hidden by default.
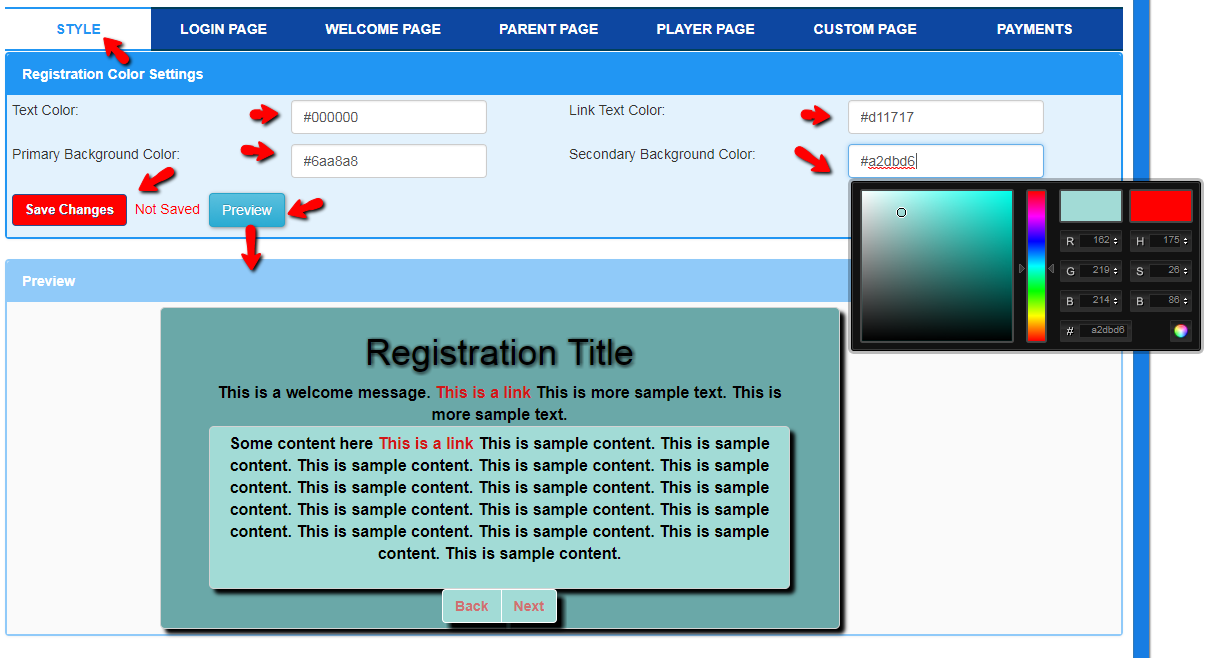
Step 1: Basic Registration Look
This page will allow you to choose the color scheme of your registration. Make sure to click "Save Changes" when you are satisfied with your color choices.
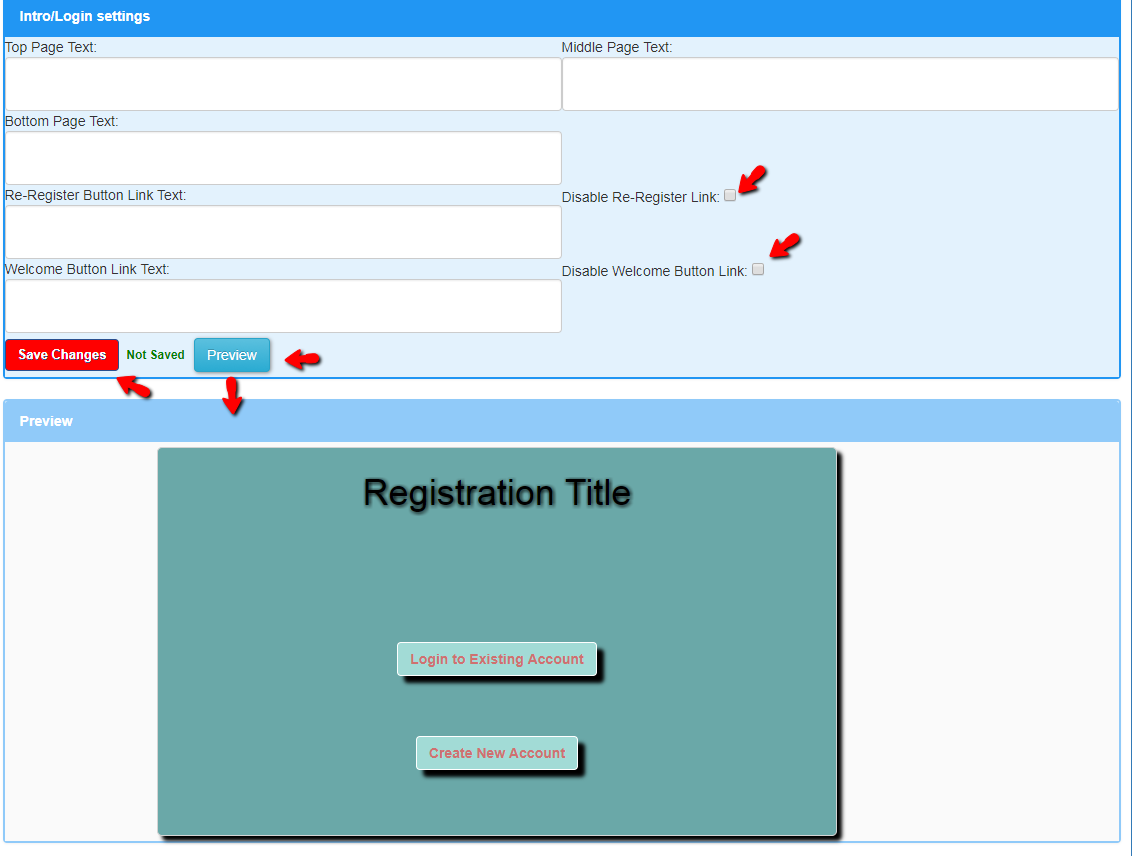
Step 2: Intro Setup
This step will adjust the intro step of your registration. Here you can adjust the welcome message, link text, and remove certain links. When you are finished click "Save Changes".
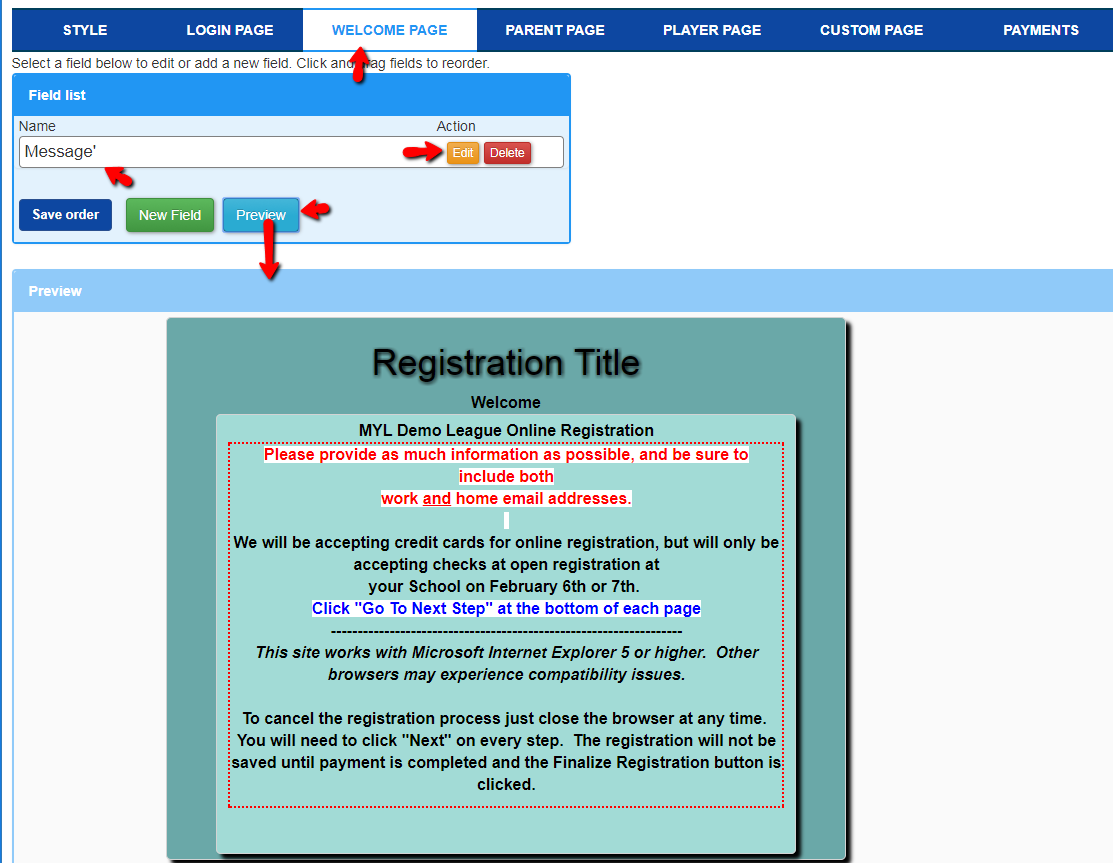
Step 3: Welcome Setup
On this step, you can enter information you want your registrants to see when beginning registration. You can edit an existing step field from the "Field List" or create a new fields by selecting "New Field". The preview will update with the information your select and enter. To reorder items click and drag them in the left step field box, then click "Save Order". When you are finished editing the step field be sure to click either "Add Field" or "Save Field" when finished.
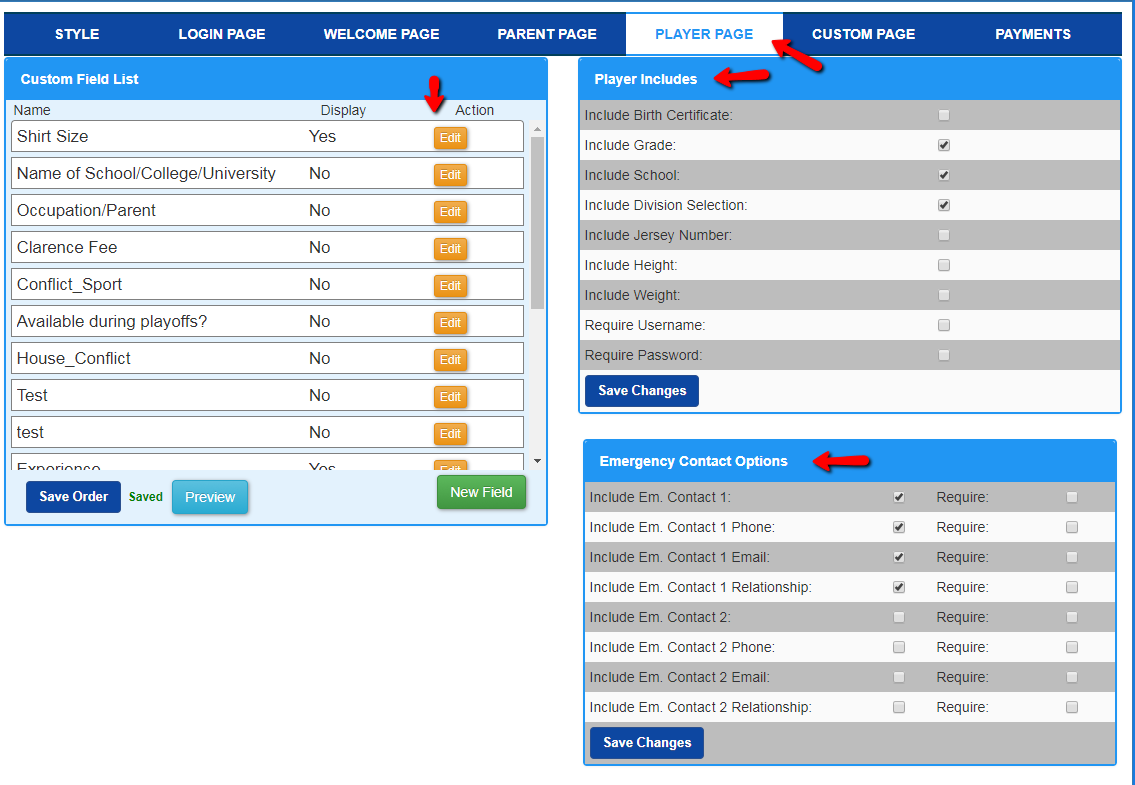
Step 4-5: Player and Parent Setup (Parent only available in youth leagues.)
In this step you can edit all the options for your player and parent steps as well as add or edit parent/player custom fields. You can add a new field to the page using the "New Field" button. Make sure to click "Add field" or "Save Field" when finished. To edit field order, Click and drag the fields then click "Save Order". Note: make sure that fields you want to show up on the registration have their display set to "Yes".
Step 6: Custom Page Setup
On this step, you can edit the custom pages. To select a page to edit, click the edit button to the right of the page name. 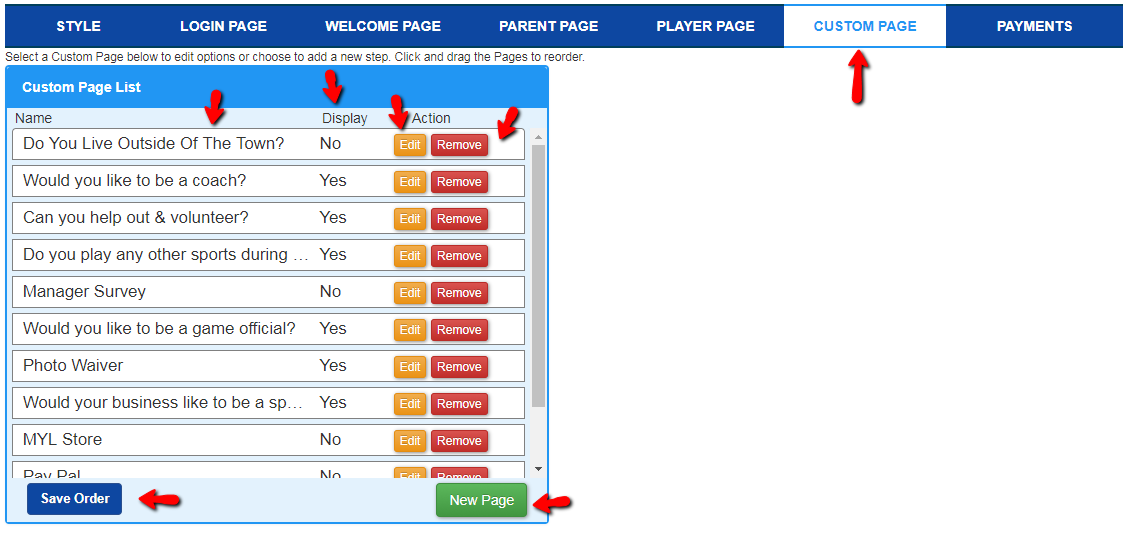
You can adjust the page options or add, edit, or remove step fields. Make sure to click save for any order or content adjustments. To re-order the pages, click and drag them to the proper order and click "Save Order".
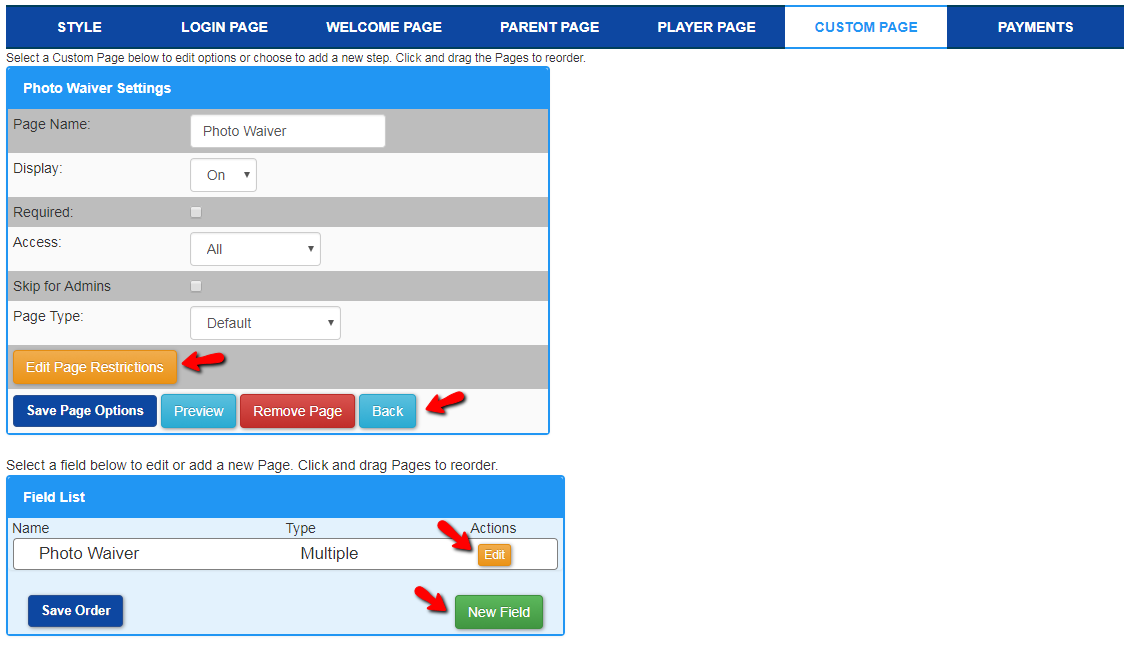
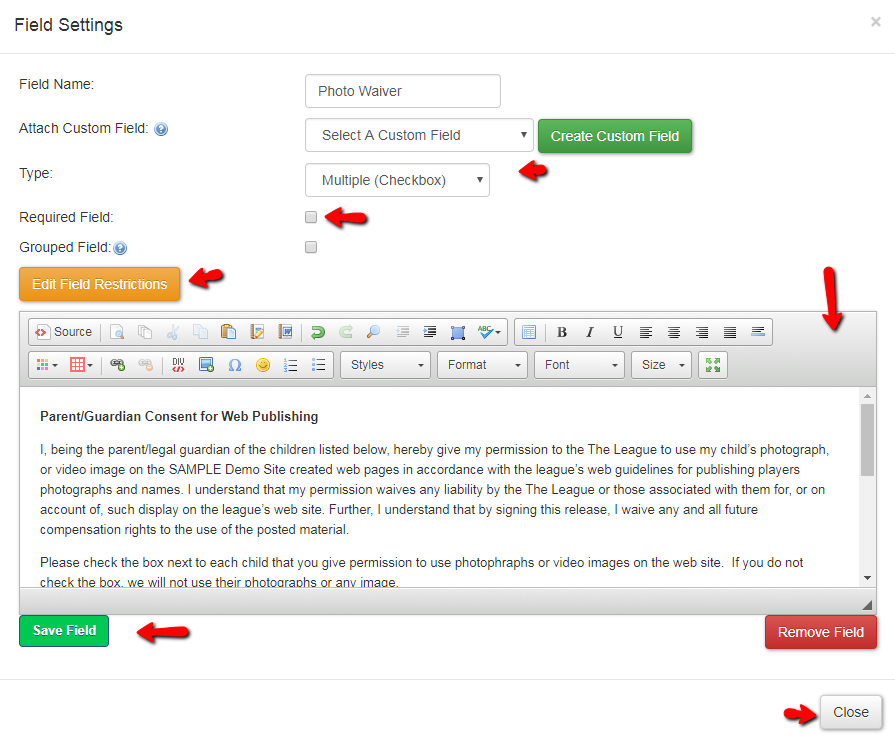
When editing a step field, you can change the type of field, restrictions, the custom field to which it is tied, and the text tied to the field. Remember to hit "Save Field" if you make any changes.
Step 7: Payment Step Setup
In the final step, you can setup the fees for your registration. Click the edit button to the right of a a fee group in the "Fee Group List" to see the fee group options and the fee codes. Select a fee code to see the Fee Code Options, Variables, and Fees. When you make adjustments be sure to click the corresponding save button.
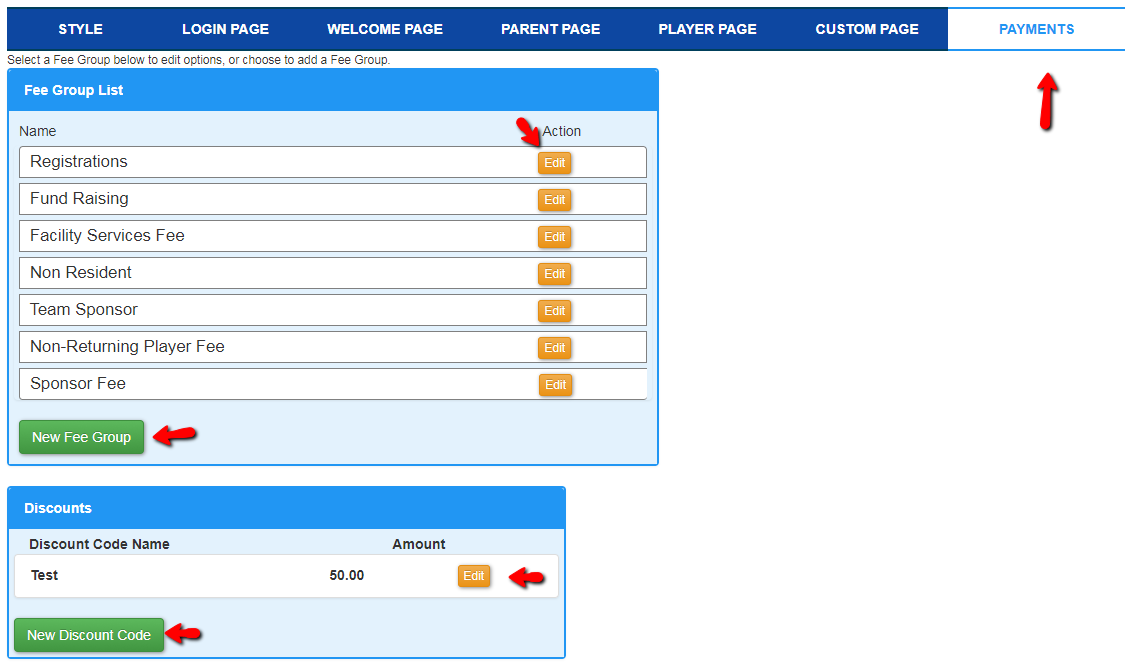
When you are done click "Finish" to go back to the dashboard. Make sure all wanted changes are saved first before hitting finish.
Test Registration:
Menu:( Registration -> Registration Wizard)
Please test your registration when done:
- Make sure you register multiple players as one family
- see if you can register for all divisions
- custom fields are working correctly
- all fees are working.
Tags: division, Fee Structure, League, Payment group, Registration, season